
Frozen Shoulder (Adhesive Capsulitis): Causes, Symptoms, Diagnosis and Treatment
By Stephen Bunting, Specialist MSK Physiotherapist
If you’ve been struggling with a painful, stiff shoulder that just won’t seem to move the way it used to, you may have a frozen shoulder.
In this article, I’ll explain what frozen shoulder (also known as adhesive capsulitis) is, why it happens, how it’s diagnosed and, most importantly, what you can do about it — including a set of exercises you can try at home to help get your shoulder moving again.
The information can also be seen in video format below.
What Is Frozen Shoulder?
Frozen shoulder is a condition where the shoulder joint becomes painful, stiff and difficult to move — almost as if it’s stuck, or “frozen”.
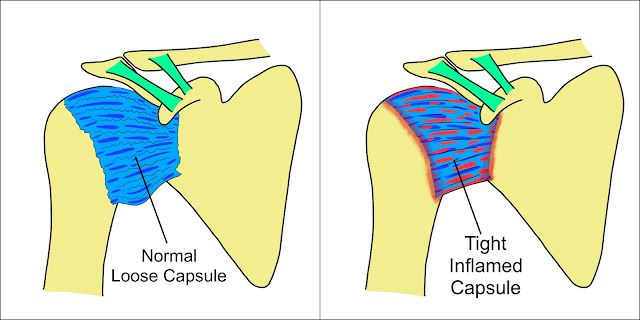
It happens when the capsule that surrounds the shoulder joint becomes thickened and tight. In a normal shoulder, the capsule is a sleeve of soft tissue that surrounds the joint and helps keep everything in place. It’s usually quite lax and saggy, which allows the huge range of movement available in our shoulders. In frozen shoulder, this capsule thickens and tightens, almost like shrink wrap. It essentially glues itself down, or adheres, to the underlying shoulder joint, which is where its official name, adhesive capsulitis, comes from.
The Three Stages of Frozen Shoulder
Frozen shoulder typically goes through three distinct stages, and the best treatment depends on which stage you’re in, so it’s worth understanding them before we get to treatment.
Stage 1: The Freezing Stage
The main symptom of the freezing stage is pain. The capsule is angry and inflamed, and the shoulder becomes more and more painful, especially when you try to move it. Frozen shoulder sounds quite innocuous, doesn’t it? But the pain from a raging frozen shoulder in this early stage can be one of the most painful conditions in the MSK world. It lasts between 1-6 months on average. It’s likely to be painful to move your arm in any direction, and your sleep is probably going to be disturbed.
Stage 2: The Frozen Stage
The main symptom of the frozen stage is stiffness. For most people this comes as a major relief, because the pain finally settles down and you can sleep better — but the stiffness now sets in. The inflamed capsule calms down, but it becomes tight and scar-like (the medical term is fibrotic). You’ll struggle to lift your arm away from your body, out to the side or behind your back, so things like tucking a shirt in, fastening a bra or combing your hair become difficult. This is the longest stage, lasting an average of 6-12 months.
Stage 3: The Thawing Stage
Now the pain has pretty much gone and the stiffness finally starts to loosen up. This can take a few months to over a year, but in the end your shoulder should fully recover. It has to be said, though, that some people never quite get their full movement back after a nasty frozen shoulder. They may just lack that last bit of end-range movement.
Unfortunately, a frozen shoulder can take between one and three years to go through all three stages, but the good news is that most people do get better over time. The early freezing stage doesn’t last too long in most people, and once you’re into the frozen stage, the pain usually drops right down. Despite the stiffness, most patients are fairly relieved and relatively comfortable by then.
What Causes Frozen Shoulder?
The truth is that we don’t fully understand all the reasons why frozen shoulder happens, but there are some clear risk factors:
- It’s more common in people aged 40 to 60.
- It affects women slightly more than men.
- People with diabetes or thyroid problems are more likely to get it, particularly if their diabetes is poorly controlled.
- It can occur after a shoulder injury or surgery, especially if the shoulder is kept still for a long time.
Often, though, frozen shoulder develops without any obvious cause, which can be really frustrating.
Here’s a key point: frozen shoulder is not caused by poor posture, sleeping awkwardly or lifting something too heavy. It’s usually not your fault — it’s a medical condition that can happen to anyone.
There’s one other bit of bad news. If you have a frozen shoulder, there’s a 20% chance of getting it in the other shoulder within five years. But that’s also an 80% chance that you won’t, so fingers crossed.
How Is Frozen Shoulder Diagnosed?
Frozen shoulder is a clinical diagnosis, meaning that in most cases it can be made from having the right symptoms and examination findings. Imaging is not usually needed, although I will often request an X-ray just to rule out bone or joint problems such as arthritis, fractures, dislocation and some rarer bone conditions, as these can mimic the symptoms of a frozen shoulder.
The most important clinical feature of frozen shoulder, particularly in the frozen stage, is a lack of external rotation. This is the movement where the shoulder rotates outwards. To check it, tuck your elbows into your sides, bend them to a right angle and then rotate your forearms outwards. In a normal shoulder, the range is between 70 and 90 degrees. In a frozen shoulder, it may only rotate to less than 10 degrees.
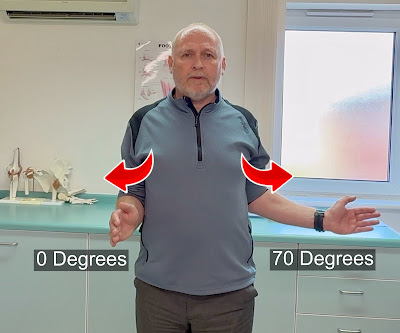
This is the key sign that you probably have a frozen shoulder, especially if your X-ray is otherwise normal. The other movements that will be stiff are reaching your hand behind your back, and lifting your arm up overhead.
Treatment Options
The main treatments focus on two things: managing pain, and then improving movement and strength. Here’s a step-by-step plan.
First, though, it’s worth saying that once I’ve explained the three stages to my patients, and highlighted that frozen shoulder usually gets fully better over time, some of my patients (especially those with milder symptoms) are happy to be reassured and simply let nature take its course, with the passage of time as their treatment. If that’s you, that’s a perfectly sensible approach. For everyone else, and particularly if your symptoms are severe, read on.
The Freezing Stage: Managing Pain
If you’re in the early freezing stage, pain is likely to be your main problem and it can be really severe.
Pain relief medication. The simplest thing to do straight away is to use pain relief medication and anti-inflammatories if you’re able to take them. Speak to a prescriber or pharmacist if you have any doubt. Please don’t discount the importance of this. A simple painkiller like Paracetamol (Tylenol), or something with a bit of Codeine like Co-codamol, combined with an anti-inflammatory like Ibuprofen (Advil) or Naproxen, can be really helpful.
The key is to take them regularly, at the full dose stated on the packet and never exceeding it. The main reason painkillers don’t work as expected is that people take them infrequently, as and when needed, so the therapeutic effect never gets a chance to build up and be maintained. If the packet says to take tablets at set intervals, take them at those intervals rather than waiting for the pain to build.
Ice or heat. For most people, heat helps, but occasionally I see people who get better pain relief from an ice pack. Try each and see for yourself. There is no right or wrong in frozen shoulder.
A cortisone injection. If your pain is severe and disturbing your sleep, an injection is going to be your best option. It can really put the fire out in an angry frozen shoulder. It won’t help much with stiffness, but for pain it can be very effective, and I offer one quickly to most of my patients with a painful frozen shoulder, especially if sleep is being disturbed, which is a horrible situation to be in. So don’t suffer needlessly.
If you have the option of having it done under ultrasound guidance, that’s usually better for accuracy, especially if the shoulder is also very stiff, because the needle has to get underneath the capsule, which often becomes tight and stuck down as the condition progresses. If you’ve had an unguided injection that hasn’t helped, it may be because the needle didn’t quite get under the capsule and into the joint cavity.
[Internal link: cortisone injection article]
The Frozen Stage: Restoring Movement
Once the pain is under control and the condition is moving into the frozen stage, the emphasis of treatment shifts towards maintaining, and then improving, your shoulder movement and strength. This is done with regular stretches and exercises, because the research is clear that movement is medicine — but you have to start slowly and not push into pain too aggressively. Try to keep any pain below about 4 or 5 out of 10.
Frozen Shoulder Exercises
Here is a simple set of exercises that are safe to do at home and are designed to gently stretch and then strengthen your shoulder. They’re grouped by stage, so choose the ones that suit where you are.
You can see them all demonstrated in the video below.
Gentle Mobility Exercises (Freezing Stage)
These first exercises are great for the painful early freezing stage.
Pendular swing. This is a great exercise for moving your shoulder in the most painless way possible, so it’s a good first exercise. Use a chair for support and lean slightly forwards to create a space, so you can gently swing your arm like the pendulum of a clock. There’s no effort here. It’s not a stiff, rigid movement, but a nice, relaxed swing. Start by swinging forwards and back, then progress by holding for a second in the high positions. You can also do the same exercise from side to side. If you’re struggling to relax and get that smooth pendular action, try holding a small weight, such as a 1kg dumbbell, a 1-litre bottle of water or a 1kg bag of sugar.
Assisted elevation. These exercises use your good arm to help lift your affected arm as high as you can with minimal pain. Grasp your hands together and lift them upwards and forwards as far as you can. You might only be able to lift your arms a little way, and that’s fine — just go as high as you can without causing pain. Another way of doing the same thing is to use a broom handle, walking stick or golf club, using the strength of your good arm to slowly and carefully lift your frozen shoulder.
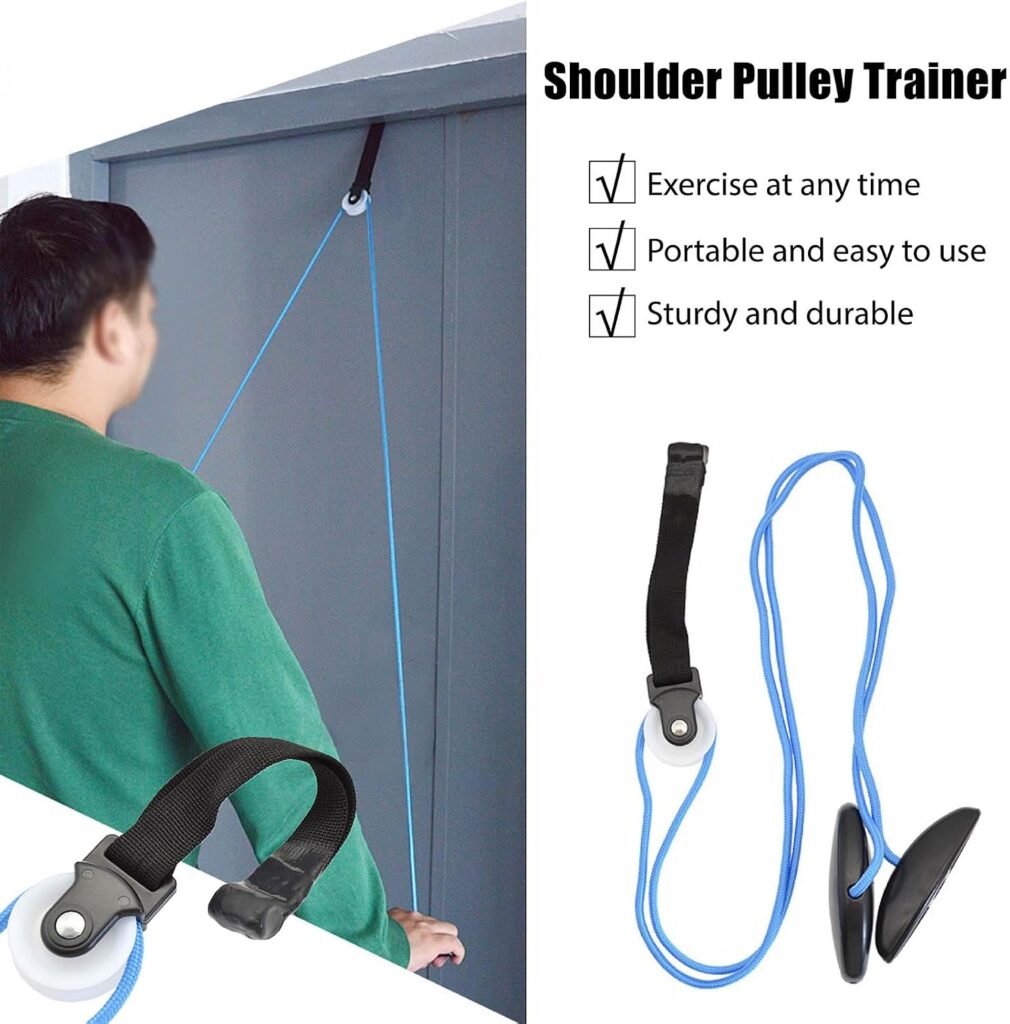
Pulleys. A set of pulleys is another great way to achieve maximum shoulder elevation with minimal pain. It hooks over the top of a door, and as you pull down with your good arm, your affected arm essentially gets a free ride upwards. You can control the amount of movement very precisely, so it feels very safe and secure. You can also turn side-on to the pulley and move your arm out to the side. It’s great for the painful freezing stage, but can also give a more intensive stretch in the later frozen stage, so it’s a really versatile exercise.
Ad: the link below is an affiliate link. We earn a commission if you buy through it, at no extra cost to you. See our affiliate disclosure for details.
External rotation stretch with a stick. This gentle stretch addresses external rotation, which is always stiff in frozen shoulder. Bend your elbows to 90 degrees and tuck them into your sides. Holding a stick in both hands, use your good hand to push the palm of your affected hand out to the side, stretching the shoulder. Keep the elbow of the affected arm tucked in all the time, as this makes sure you’re doing a true rotation movement. Hold the end stretch position for a few seconds each time.
Table slide. Using a raised surface such as a table or kitchen worktop, put your hand on a cloth or something that will slide easily over the surface. Practise sliding your hand forwards and back, side to side, and then in circles. To progress, stand a bit further away from the table.
Stretching Exercises (Frozen Stage)
These exercises are more suited to the frozen stage, where pain is less of a problem but stiffness is the main issue.
Wall walks. In their most basic form, you simply walk your fingers up the wall as high as you can, pause for a second, and then slowly slide your hand back down. If this feels too easy, there are several progressions. First, slide your hand from side to side in the highest position. Next, tilt your upper body forwards, which adds an extra stretch to your shoulder. You can then do a little press-up against the wall in the highest position, and finally do the same with your hands further apart.
External rotation stretch using a door frame. These more intensive stretches use a door frame to essentially lever your shoulder into rotation. As with the other external rotation stretches, have your elbow at 90 degrees and tucked into your side. Place your open palm against the door frame and slowly turn your whole body outwards, while your hand and arm stay in the same position. Go as far as you can to get a good stretch, respecting pain, and hold for a few seconds. To progress, take your whole arm up into elevation by holding the top of the door frame, and then do the same outward turn with your body. These stretches can be quite aggressive, so go easy to start with.
Hand behind back stretch. This movement is often quite stiff and painful, so go easy at first. Take your hand as far behind your back as you can, and then give it a little pull with the hand of your good arm. To progress, use a bath towel to pull your hand further up your back.
Strengthening Exercises (Thawing Stage)
These last exercises are for when your shoulder starts to move into the thawing stage. Your pain has pretty much gone, your movement is improving, and you now want to get some strength back.
Resistance band external rotation. This is the same external rotation movement you’re now familiar with, but this time using a resistance band to generate some tension and muscle activity. It’s best to do both shoulders together, as you can easily judge the strength of one side compared to the other.
Wall walk with a hold. This is similar to the wall walk described above, but in the highest position, take your hand off the wall and hold it there for 5 to 10 seconds. You can also do this with a small weight, such as a 1-litre bottle of water.
Wall press-up and wall falls. Start with a simple wall press-up. As you get stronger, move further away from the wall, or progress to a table, or a full press-up position if you like. A variation is the wall fall: fall towards the wall, catch yourself with your hands, and then push yourself quickly back to the starting position. To progress, move further from the wall and then use just one arm, or use a table or work surface of that height so you have further to fall.
How Much Should You Do?
You don’t need to do all of these exercises. Just pick three or four that are suitable for your stage of frozen shoulder, whether that’s the freezing, frozen or thawing stage. Start with 5 to 10 minutes per day, three to four times per week, and then gradually increase. Don’t worry if it feels stiff — that’s normal. If it’s very painful, ease off and focus on pain relief strategies first.
While you’re in the frozen stage, progress might seem very slow or even static, but keep at it. At the very least, you’ll be stopping the shoulder from getting worse, and once you get into the final thawing stage, your movement should start to improve and you can focus more on the strengthening exercises.
What If Nothing Is Working?
In severe cases of frozen shoulder, where the pain and stiffness just won’t settle despite trying all the treatments above, there are a few interventional options that a specialist can provide. This might be someone who is stuck in the freezing stage in severe pain, with no sign of improvement after three to six months, or someone who is stuck in the frozen stage and still has a very stiff shoulder that hasn’t thawed after about three years.
Hydrodistension
The first thing that might be tried is a procedure called hydrodistension. A needle is placed under the joint capsule using ultrasound guidance, and a large volume of fluid, usually a mixture of local anaesthetic and sterile water, is injected under pressure into the shoulder joint, with the aim of stretching the capsule from the inside outwards. It doesn’t work for everyone, but I’ve had some great results from using this procedure, and it’s minimally invasive with very few side effects or complications, so it’s often worth a try.
Capsular Release Surgery
If hydrodistension doesn’t work, the only remaining option is surgery. A surgeon can carefully cut away at the tight capsule in an effort to free the shoulder and restore movement. The procedure is called a capsular release (sometimes a rotator interval release) and it’s done as a keyhole procedure, usually under a general anaesthetic.
Manipulation Under Anaesthetic (MUA)
Historically, a procedure called manipulation under anaesthetic, or MUA, was used to achieve the same thing. This involved putting the patient to sleep and then literally wrenching the shoulder into the stiff positions, essentially tearing the tight capsule. We’ve since learned that while it might tear the capsule, it can also tear other tissues that you don’t want torn, such as the rotator cuff tendons, which can then cause further problems. An MUA is really not advisable in modern healthcare, and I wouldn’t recommend it.
Diabetes and Frozen Shoulder
It’s important to mention diabetes, because a diabetic frozen shoulder can be a real problem and can often take twice as long to get better compared with a non-diabetic frozen shoulder. Your symptoms will be worse and your recovery longer the poorer your diabetic control is.
If your HbA1c blood test is consistently over about 80 mmol/mol, you need to urgently prioritise your diabetic control over every other treatment. It’s the high circulating blood sugar that will be driving the condition, and unless you do something about it, nothing else is going to help much, including the treatments I’ve discussed. The interventional treatments won’t be offered because they won’t be effective. So it’s really, really important to get your diabetes under good control.
[Internal link: Diabetes and MSK Problems article]
Summary
- Frozen shoulder is a self-limiting condition. It gets better with time in the majority of cases, but you can help it along by staying as active as you can.
- Don’t push through severe pain, but don’t avoid using your shoulder altogether. Keep it moving within your pain tolerance, but do get help if pain is a real issue. An injection can give great pain relief.
- Be patient. It’s a slow process, but the exercises above will make a real difference if you do them consistently.
If your pain and stiffness aren’t improving as expected, or if you’re struggling to cope, please see a healthcare professional. Options like physiotherapy, injections or even surgery may be appropriate.
This article is for general information only and does not replace individual assessment. Start any exercise gently and stop if your symptoms worsen significantly. If you have severe or rapidly worsening symptoms, or you’re concerned about your health, please seek urgent advice from a qualified healthcare professional. See our full disclaimer for more information.